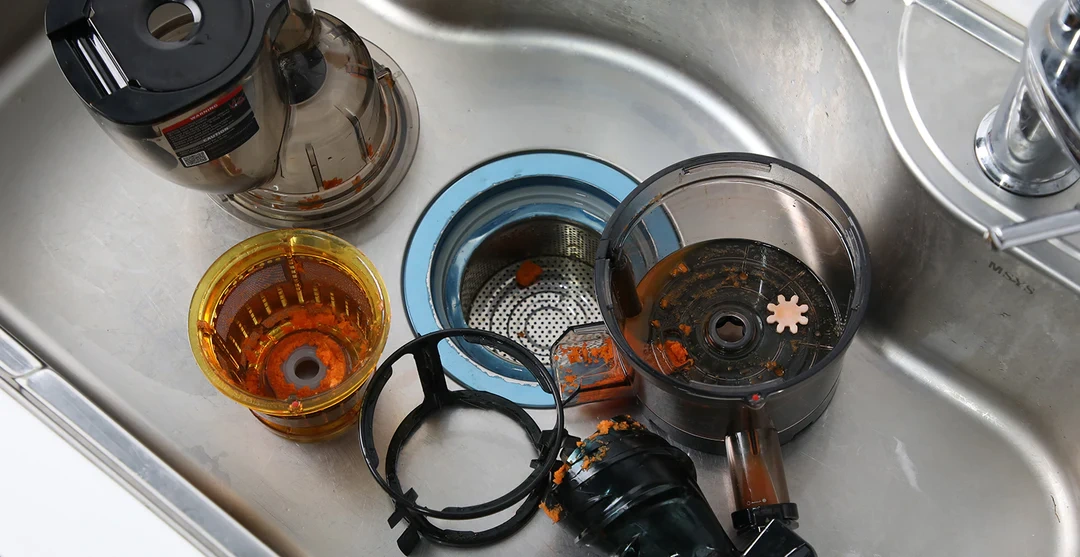
No, Kuvings juicer parts are not dishwasher safe. Dishwasher heat can warp or damage the BPA-free plastic components. Kuvings instructs users to handwash all parts with mild soap and water. The juicer is designed for quick manual cleaning using the included brushes and a fast rinse.
Can You Put a Kuvings Juicer in the Dishwasher?
To answer your most pressing question directly: No, Kuvings juicers cannot be put in the dishwasher under any circumstances. This isn’t just a suggestion—it’s a firm instruction from the manufacturer that should never be ignored if you want your juicer to last.
Why dishwasher use is not recommended
The primary reason Kuvings advises against dishwasher cleaning relates to the materials used in their juicers. Most Kuvings juicers are made with BPA-free Ecozen material, which provides excellent durability during normal use yet cannot withstand dishwasher conditions. Unlike standard plastics found in many kitchen appliances, these specialized materials maintain their quality through hand-washing only.
Additionally, Kuvings has designed their juicers with precision parts that fit together perfectly—something that could be compromised by the harsh environment inside your dishwasher. While it might seem convenient to toss everything in the dishwasher after making your morning juice, doing so would ultimately lead to more hassle as parts become damaged.
What Kuvings says about dishwasher safety
Kuvings is crystal clear about this issue across their official channels. According to their help center: “Our products are not dishwasher-safe. Instead, handwash the parts with mild soap and cold water.” They further recommend that “For a deep clean, spray the parts with white vinegar and wipe thoroughly.”
This stance remains consistent throughout all Kuvings official documentation and websites. Furthermore, the Australian branch of Kuvings states plainly that “Kuvings Cold Press Juicer parts are not dishwasher safe, so you will need to wash by hand.”
Risks of using dishwasher on juicer parts
Placing your Kuvings juicer parts in the dishwasher creates several serious risks:
First, the high temperatures inside modern dishwashers can permanently damage your unit. These elevated temperatures may cause warping of plastic components, which subsequently leads to improper alignment when reassembling your juicer.
Second, exposure to harsh dishwasher detergents combined with intense heat accelerates the breakdown of materials over time. This degradation often appears as discoloration or brittleness in the components.
Third, the powerful water jets inside dishwashers might physically damage delicate parts or dislodge components. Since Kuvings juicers contain several precision parts, any minor damage could affect the entire juicing process.
Essential Cleaning Tools for Your Kuvings Juicer
Now that we’ve established that Kuvings juicers require hand washing, let’s explore the specialized tools that come with your juicer to make cleaning quick and efficient.
Green cleaning brush
The patented green cleaning tool is Kuvings’ signature innovation for maintaining your juicer. This unique tool is specifically designed to clean the stainless steel strainer—often the most challenging part to clean. To use it effectively, simply insert the strainer into the tool and rotate it clockwise and counterclockwise under running water. The small brushes inside perfectly adapt to the stainless steel mesh, removing pulp deposits that would otherwise be difficult to clean by hand. This tool comes standard with all Kuvings juicers and makes maintenance significantly easier.
White toothbrush-style brush
Alongside the green tool, Kuvings includes a white toothbrush-style brush specifically for more stubborn residue. I’ve found this tool particularly valuable for manually scrubbing the inside of the strainer when pulp becomes lodged in the tiny holes. For optimal cleaning, use this brush to target specific areas after your initial rinse. The precision bristles reach places the rotating brush sometimes misses.
Wire brush for spouts
The wire brush is designed specifically for cleaning the juice spout and pulp spout. These narrow openings can be difficult to clean with standard tools, yet they’re crucial areas where residue can build up. The thin, flexible design allows you to reach deep into these passages, ensuring complete removal of any remaining juice or pulp particles.
Lemon and orange as natural cleaners
Beyond the physical tools, Kuvings recommends using nature’s own cleaning agents. Adding a slice of lemon to your juicer after you’ve finished juicing helps push out remaining pulp while giving your juicer an internal clean. Similarly, if you juice turmeric (which notoriously stains everything it touches), adding orange slices with the peel on effectively removes the stickiness and staining. These natural solutions eliminate the need for harsh chemicals while maintaining your juicer’s pristine condition.
Step-by-Step Guide to Cleaning Your Kuvings Juicer
Cleaning your Kuvings juicer doesn’t have to be a chore when you follow these simple steps. Once you’ve done it a few times, the entire process takes only 5-10 minutes from start to finish.
1. Disassemble the juicer
First, turn off and unplug your juicer before taking it apart. The five main parts you’ll need to clean are the lid, strainer, wiper, auger (screw), and juicing bowl. For some models like the AUTO10, you’ll need to hold down the handle’s lock switch, then turn the hopper counterclockwise until the arrow aligns with the unlock symbol. Next, lift off each component carefully, removing the rotation wiper, juicing strainer, and auger from the bowl.
2. Rinse off pulp with warm water
Immediately after juicing, rinse all parts with warm water to prevent pulp from drying and sticking. Use the narrow end of the included brush to push away excess pulp. The force of the water helps dislodge remaining particles. Finding pulp in the auger cavity is completely normal—that’s actually why that cavity exists!
3. Use brushes to clean strainer and spouts
Following the initial rinse, use the wire brush specifically designed for cleaning the juice spout and pulp spout. These areas can accumulate residue that affects your next juicing session. For the AUTO10 model, you can unlock the pulp outlet for easier access during cleaning (just remember to lock it before juicing again).
4. Apply dish soap and scrub gently
After that, wash all components with mild dish soap. Use the included brushes, a sponge, or a dish scrubber to ensure everything gets thoroughly cleaned. Scrub gently with a soft brush to lift any remaining stains, especially with parts that handled ingredients like turmeric that can leave stubborn coloration.
5. Use green tool for strainer
The patented green rotary brush makes cleaning the strainer remarkably easy. Insert your strainer into the tool, then twist it clockwise and counterclockwise repeatedly under running water. The small brushes inside the tool align perfectly with the stainless steel mesh, effectively removing pulp deposits from all those tiny holes.
6. Let all parts air dry
Finally, rinse everything thoroughly and allow all parts to completely air dry before reassembling your juicer. This step is crucial—never assemble your juicer while parts are still wet, as this can lead to mold growth. Proper drying ensures your Kuvings juicer stays in optimal condition for years to come.
Tips to Make Cleaning Easier and Faster
Want to spend less time cleaning your Kuvings juicer? These practical shortcuts will make maintenance faster without compromising thoroughness.
Use a biodegradable bag in the pulp jug
First and foremost, place a biodegradable bag inside the pulp container to eliminate one cleaning step entirely. Simply empty the bag and reuse it, or toss the whole thing into your compost if it’s biodegradable. This trick saves valuable time otherwise spent scrubbing dried pulp from containers.
Rinse immediately after juicing
Cleaning right after juicing prevents pulp from hardening on components. The entire process takes just 5-10 minutes when done promptly. On top of this, immediate rinsing makes removing pulp much easier as water pressure helps push residue away.
Use smart cap rinse trick
Close the smart cap, pour approximately 200ml of water through the feeding chute, then run the juicer briefly. This self-cleaning technique helps push remaining pulp through the system. After running, open the cap to release the water – an effective pre-rinse before disassembly.
Avoid letting pulp dry on parts
Dried pulp becomes significantly harder to remove. For ingredients like beetroot or turmeric that stain easily, rinse immediately or juice these items last. Primarily, this prevents the whitish mineral buildup that occurs when juice dries on components.
Store cleaning tools nearby
Keep all cleaning brushes close to where you juice. This organizational hack ensures you’ll never waste time searching for tools when it’s time to clean up, consequently making the entire process more efficient.
Conclusion
After all we’ve covered, the answer remains clear – your Kuvings juicer requires hand washing rather than dishwasher cleaning. Though this might seem inconvenient at first, the specialized cleaning tools and simple techniques make maintenance surprisingly manageable. The green cleaning brush, white toothbrush-style tool, and wire brush work together to tackle even the most stubborn residue effectively.
Certainly, taking care of your Kuvings juicer properly extends its lifespan significantly. The specialized Ecozen materials deliver exceptional performance during juicing but need gentle handling during cleaning. Five minutes of proper maintenance after each use prevents hours of frustration later.